From Latest Update Google configuration is moved into a separate config tab in Setup->Settings->Google, this will allow a clear overview of all related Google config and features integrated into Xodox CRM.
In order to start configuring your Google Xodox CRM related features, you will need to create (in case you don’t have one till now) a project into a Google Developers Console. You can use one project to manage all of your applications, or you can create a different project specific for Xodox CRM.
Because Xodox CRM is a standalone application and is installed on your server and you are the data controller and responsible for processing all the data, you will need to configure additional config on the Google Developers Console page.
Prerequisite #
Create New Google Developers Console Project #
To get started, you need to first use the setup tool, which guides you through creating a project in the Google API Console, enabling the API, and creating credentials.
In most cases, after you create the project with the setup tool, the project will be auto-named My Project, but you can rename it manually to e.q. Xodox CRM, click here to see how to rename the project.
Generate API Key #
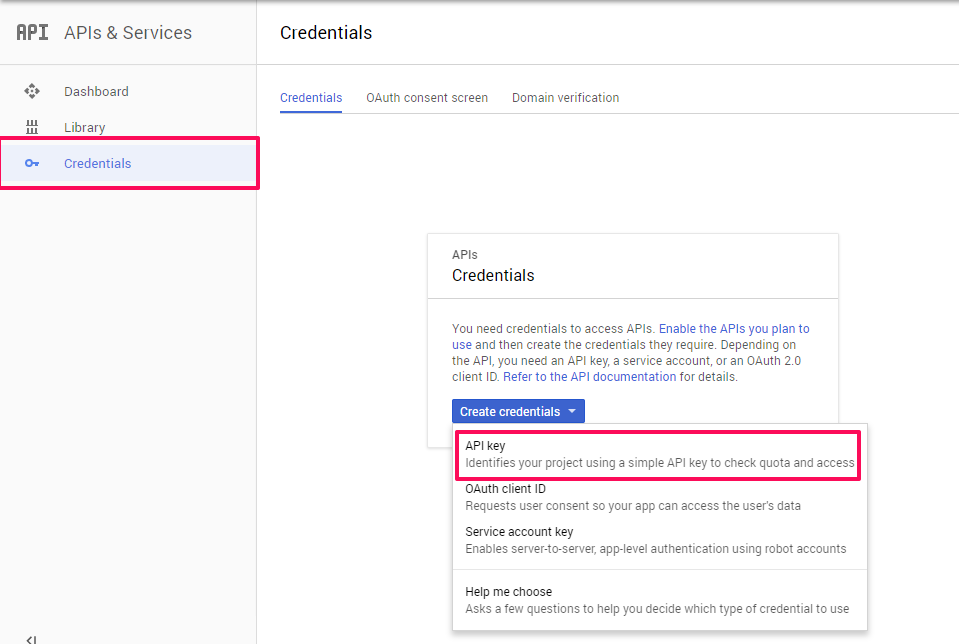
Click on the top left sidebar toggle icon then APIs & Services -> Credentials to create new API key.

Click Create Credentials then from the drop-down select API Key

Add this API key in Setup->Settings->Google in the Google API Key input field, this will be your Google API key linked to Xodox CRM that will be used for various features.
Create OAuth client ID #
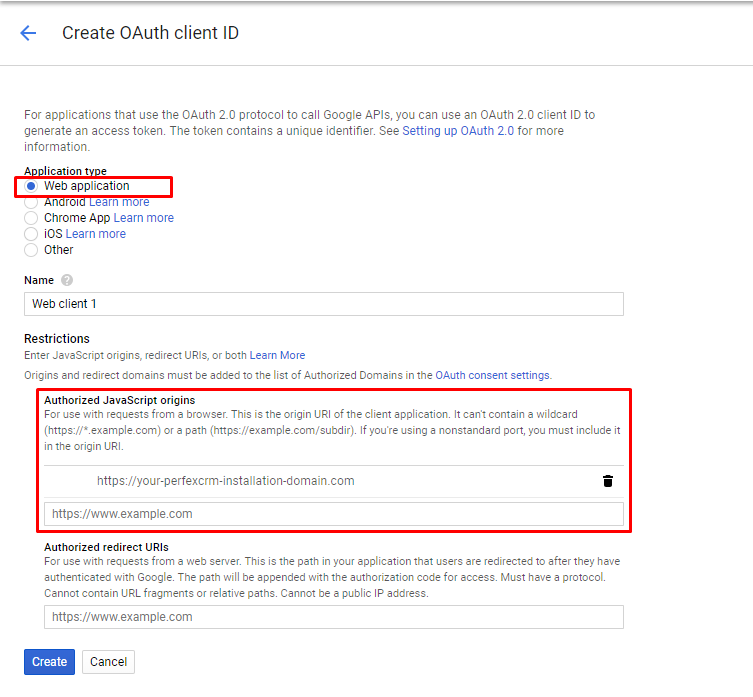
While you are on the credentials page, click Create credentials and then OAuth client ID
Google may ask you to set a product name on the consent screen, in most cases you will see this message “To create an OAuth client ID, you must first set a product name on the consent screen“, click on the right button Create consent screen and fill all the required fields, see below example of the consent.

After you create the consent, save and refresh the create OAuth client ID page, you should be able to start creating the OAuth client ID key as shown below.

After you create the OAuth client ID your credentials page should look like the image below.

You can now copy the client id and add this client id in Xodox CRM in Setup->Settings->Google->Google API Client ID.
Google Features #
Google Drive Picker (from v2.2.0) #
NOTE: This feature requires verification from Google, see below for more more information.
Google Drive Picker is a feature added in Xodox CRM in Latest Update this feature will allow you to link your/staff members Google account and select files to be included in Xodox CRM directly from your Google Drive, similar feature exists in Xodox CRM with Dropbox.
Enable Google Drive API and Google Picker API Library #
First, you need to enable the Google Drive and Google Picker API libraries in the project you created, to achieve this, click on the top left menu toggle then APIs & Services->Library and search for Google Drive, click on the library and then click Enable then perform new search for Google Picker API and enable it.


Enable Google Drive in Xodox CRM #
The Google Drive feature is disabled by default and can be enabled once you configure the Google API Key, the OAuth Client ID and enabled the Google Drive Library, after ensuring this, in order to enable this feature, you can navigate to Setup->Settings->Google and set Enable Google Picker to Yes.
Authentication Google Drive #
Once you enabled Google Drive Picker, navigate e.q. to some area where the Google Drive is available, for example, in this case, we will use the project files Google Drive and click on the right button Choose From Google Drive

A new popup will be shown to choose your Google account that you will grant access for the application.

App Verification #
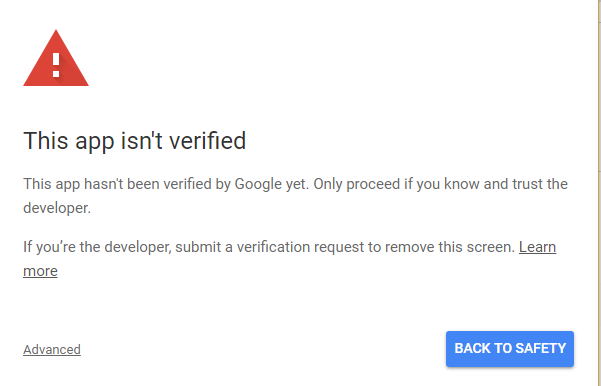
After you select your account, probably you will see a message “This app isn’t verified“, it’s your responsibility to ensure that the Project/App you created is verified, you can click here to read more how to verify your application, otherwise click on Advanced then Go to [App Name] (unsafe) just to test this feature for your own account.

The verification process is clearly explained by Google and all the steps how you can verify your app, as Xodox CRM does not hold any data for your company, you will need to verify this on your own as you will use the Google Drive Picker.
When Google asks for privacy policy URL, if you have a privacy policy for your main website, you can use this privacy policy or you can enable Xodox CRM GDPR features and use privacy policy page directly from Xodox CRM.
Support Features for Google Drive #
Currently, Google Drive Picker is available for the following features:
- Tasks
- Invoices
- Estimates
- Proposals
- Leads
- Customer Profile Files
- Contracts
- Project Files
Setup Google Calendar #
To setup google calendar first, follow this steps.
Enable Google Calendar API #
First, you need to enable the Google Calendar API library in the project you created, to achieve this, click on the top left menu toggle then APIs & Services->Library and search for Google Calendar API, click on the library and then click Enable.

Make your Google Calendar public: #
In the Google Calendar interface, locate the “My calendars” area on the left.
Hover over the calendar you need and click the downward arrow.
A menu will appear. Click “Settings and sharing“.

Check “Make available to public” and make sure “See all event details” is selected

Obtain your Google Calendar’s ID #
While you are in the Settings and sharing, search for Calendar ID, you will see your Calendar ID. It will look something like “abcd1234@group.calendar.google.com“
Copy the calendar ID and add the main calendar id for your company in Setup->Settings->Google in the field Calendar ID
Setup Google Calendar for departments #
Create a new calendar in the Google Calendar interface and get the calendar ID (same steps as mentioned above). Probably already you set up the Google API key in Setup -> Settings -> Google, now navigate to Settings -> Departments and add the Google calendar ID into the Google Calendar ID field for the department you want to set up. For multiple departments, you need to create different calendars in the Google Calendar interface.
Keep in mind that the main calendar is shown to all staff members.
Calendar Debugging #
If you experience any problems setting up the calendar you should debug by hitting F12 on the keyboard (or right click inspect element on a browser) to and click console. If any errors are shown will be visible in the console.

Google reCaptcha #
First, you need to generate Secret key and Site Key.
- Go to https://www.google.com/recaptcha/admin
- On Register new site enter Label eq. Xodox CRM – reCaptcha
- Add your domain name
- Click Register

Copy the Secret Key and Site Key and go to Setup->Settings->Google->reCaptcha paste in the necessary fields.
Try visiting the admin login the reCaptcha should be visible.
reCaptcha keys are wrong and you got stuck in login? #
In case you entered wrong keys and you got stuck in login please read more below.
Common issues here can be:
- Copying the keys with blank spaces, make sure that there are no blank spaces.
- Copying the keys with additional text around this key.
- The reCaptcha keys not existing in your in your google reCaptcha account.
Disable reCaptcha from phpmyadmin
- Login to cPanel.
- Go to phpmyadmin and select the database that Xodox CRM is using.
- Go to table tbloptions and by clicking on the top search phpmyadmin button do the following searches for the column name
- recaptcha_secret_key
- recaptcha_site_key
- Set the values on both rows empty.
Customer Map #
Customer map is a feature used in the admin area and once you set up this feature for customer each time when you need the customer company location you can navigate to this customer profile and click on the Map tab.
To use this feature first you need to have properly configured Google API Key in Setup ->Settings->Google and in Google Developers Console make sure that you have enabled Maps Javascript API for the project you have created, to achieve this, click on the top left menu toggle then APIs & Services->Library and search for Maps Javascript API.
Google recently changed the Maps Javascript API billing model, for this reason, Google requires to enable billing in your project. Click here to enable billing.
Once you have created a billing account and project you are eligible for the Google Cloud Platform $300 free trial and Google Maps Platform recurring $200 monthly credit. To learn more, see Billing Account Credits.
Keep in mind that it’s your responsibility to monitor your usage with maps in order to prevent overbilling, if you don’t feel confident, the best is to avoid this feature and leave it unconfigured.
This feature works with Google Map Latitude and Longitude. Get the Latitude and Longitude from google map and insert it into the customer profile.

